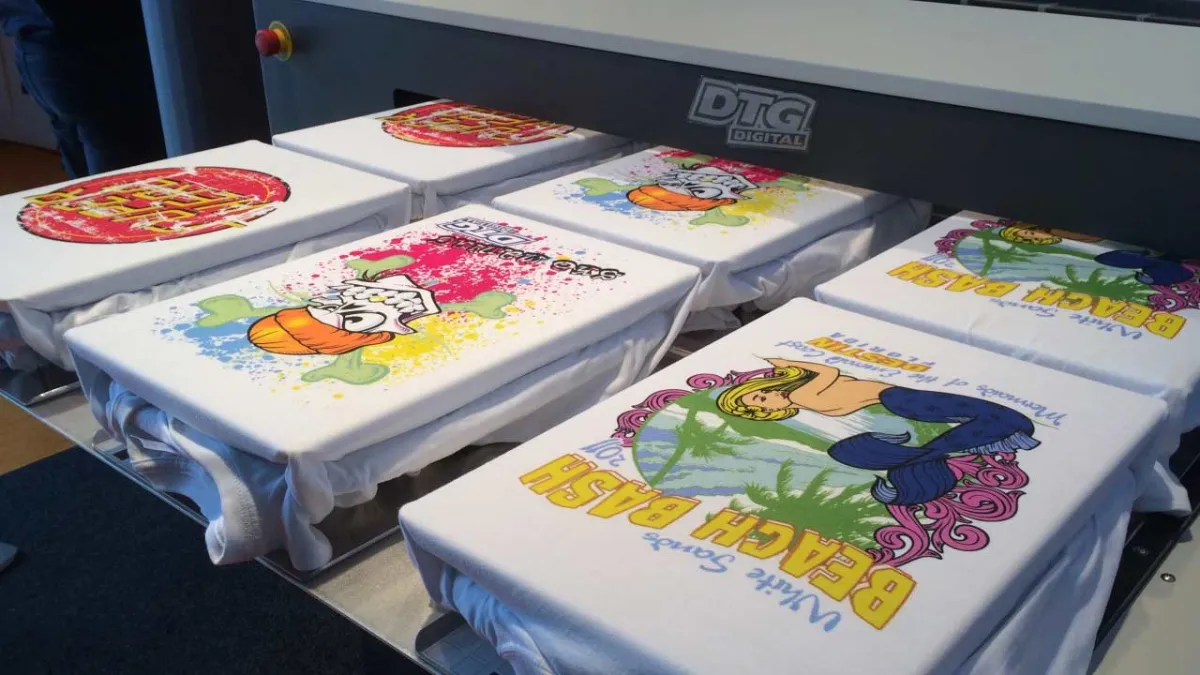

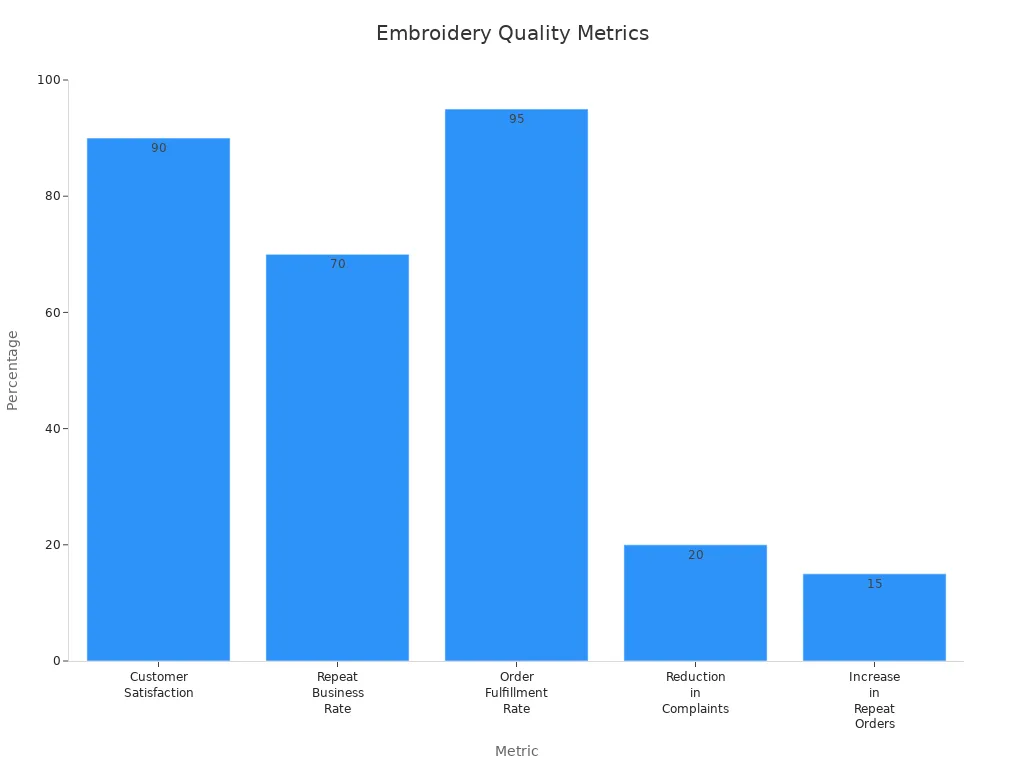
Want your custom t shirt embroidery to get noticed? Start with a smart design, good materials, and careful work. If you pick quality threads and fabrics, your custom embroidered shirts look nice and feel soft. More than 90% of people see the difference when you use the best materials. Look at these results:
You do not need special skills to make great embroidery. Anyone can make custom embroidered shirts stand out with the right steps. T-shirt embroidery looks better when you use bright thread colors and thick threads. Custom embroidered shirts also keep their shape and color longer if you use good materials. Try custom t shirt embroidery and watch your custom embroidered shirts become favorites. With custom embroidered designs, your shirts feel special every time. T-shirt embroidery gives each custom embroidered shirt a personal touch. The right choices help you make custom embroidered shirts that look and feel great. Custom embroidered shirts turn plain tees into something you remember. You will love how your custom shirts stand out with t-shirt embroidery. Pick quality and see your embroidered shirts shine. Custom embroidered shirts always get attention.
Key Takeaways
Make your embroidery design simple and bold. This helps it look clear and stitch well on your shirt. Use good fabrics like cotton and strong threads. This makes your shirts feel soft and last a long time. Pick bright thread colors that stand out. Use thick lines so your embroidery can be seen from far away. Always get your shirt ready the right way. Pre-wash it, use stabilizers, and hoop it tight. This stops puckering and shifting. Do not make common mistakes. Do not use hard designs, bad materials, or put the design in the wrong place. Do not skip any prep steps if you want your shirts to look professional.
Essential Design Guidelines
Simplicity Matters
When you start designing personalized embroidery, keep things simple. Simple designs always look cleaner and stitch better on fabric. If you try to add too many tiny details or small text, the embroidery can turn messy or hard to read. Think about what you want your custom design to say. Use bold shapes and clear images. If you can’t see the details from a few feet away, they probably won’t show up well on your shirt. Simple designs also save you time and money because they stitch faster and use less thread.
Tip: If you’re designing a logo or a graphic for embroidery, print it out at the actual size first. If you can’t read it or see the details, try making it bolder or removing small parts.
Line Thickness
Line thickness makes a huge difference in embroidery. Thin lines and tiny letters often disappear or break during stitching. You want your lines thick enough to stand out but not so thick that they blend together. Here’s a quick guide to help you:
Aspect | Recommendation / Statistic | Benefit / Explanation |
|---|---|---|
Minimum Text Height | Ensures text is legible and stitches properly | |
Minimum Line Width | Avoids thread breaks and gaps, improving stitch quality | |
Thread Thickness | Approx. 0.4 mm | Thin lines and small lettering are hard to reproduce |
Font Recommendations | Arial, Helvetica, Myriad Pro | Simple fonts give you the best results |
Fabric Consideration | Bold lines for textured fabrics | Keeps your design visible and sharp |
If you follow these numbers, your embroidery will look crisp and professional. Always avoid small text and thin lines. If you can’t read it on your screen at the real size, it won’t stitch well on your shirt.
Color Contrast
Color selection and combinations can make or break your design. High contrast colors help your embroidery pop and stay visible from a distance. You want your design to stand out, not blend into the shirt. Here’s why contrast matters:
High contrast colors like hi-vis orange and yellow make your design easy to see, even in low light.
Orange works best in cloudy or dark conditions because it stands out against most backgrounds.
Yellow shines in bright sunlight and reflects light well.
Orange stays visible from farther away, which is great for safety or team shirts.
The best color depends on where you’ll wear the shirt—think about the environment and lighting.
Both orange and yellow keep their brightness all day, but orange is easier to spot in dim light.
Bright colors like fluorescent orange, red, and yellow work well on all kinds of backgrounds, from city streets to grassy fields.
These colors stay bright even at dusk or on cloudy days.
If you add reflective thread, your design will stand out at night too.
Hi-Vis Red is perfect for busy city areas where you need to be seen.
When you pick your thread colors, always test them against your shirt fabric. Make sure your design doesn’t disappear. Good color contrast helps your personalized embroidery get noticed.
Font Selection
Choosing the right font is just as important as picking your colors. Simple, bold fonts like Arial, Helvetica, or Myriad Pro work best for embroidery. Fancy or thin fonts can turn into a jumble of threads. You want every letter to be clear and easy to read. Keep your font size above 0.25 inches (6.4 mm) so the stitches don’t bunch up or break. If you’re working on logo adaptation for embroidery, stick with fonts that have clean lines and no tiny details. This way, your message always comes through loud and clear.
Design Digitizing
Digitizing is the process that turns your artwork into a file the embroidery machine can read. This step is key for a smooth, error-free result. If you skip proper digitizing, you might end up with puckered fabric, uneven stitches, or even ruined shirts. Here’s what helps:
Use clear, high-resolution artwork. Vector files or sharp sketches work best.
Plan your stitch types, colors, and any special effects before you start.
Adjust stitch density for your fabric. Thick towels need more stitches, while silk needs fewer.
Magnetic embroidery hoops help keep your shirt stable, cutting defects by 15%.
Good digitizing software lets you control stitch angles and density, so your design looks neat and lasts longer.
Mastering digitizing means fewer mistakes, less wasted thread, and a better-looking shirt. If you want your custom embroidered shirts to look professional, never skip this step.
Note: Solid planning and digitizing make your embroidery process faster and smoother. You’ll spend less time fixing mistakes and more time enjoying your finished shirts.
By following these essential design guidelines, you set yourself up for success. Whether you’re designing a logo, a graphic for embroidery, or a custom design, these tips help your shirts stand out every time.
Fabric and Thread Choices
Best Fabrics for T-Shirt Embroidery
Picking the right fabric is very important. Soft fabrics make embroidery easier. They also help your designs last longer. Cotton and cotton blends are the best choices. These fabrics hold stitches well and feel nice to wear. Heavy, non-stretch fabrics give more support. They help your designs keep their shape. Thin or stretchy fabrics do not work as well. Your shirts may not last as long with them. Always think about quality when you pick fabric. The right fabric makes your shirts look good and feel soft.
Thread Quality
Good thread makes your shirts look better. It keeps your designs bright and strong after many washes. High-quality thread gives a smooth finish. It also helps your embroidery last longer. Check this table to see how thread choices matter:
Parameter | What Works Best for Custom Embroidered Shirts | Why It Matters for Quality Considerations |
|---|---|---|
Thread Size | Keeps embroidered designs strong and durable | |
Thread Side | Place thermoplastic threads on the back side | Reduces machine jamming and boosts embroidered quality |
Stitch Spacing | Denser spacing (0.5 mm, 1 mm) | Keeps embroidered shapes crisp and long-lasting |
Thread Direction | Align with shirt’s shape | Helps embroidered designs keep their form |
Fabric Type | Heavier, non-stretch fabrics | Supports embroidered durability and comfort |
Embroidery Config. | Dense stitches with proper line spacing | Improves embroidered shirt quality and feel |
If you use good thread, your shirts will stand out.
Matching Thread and Fabric
It is important to match thread and fabric. Thick thread on thin fabric can feel stiff. It might even make the shirt pucker. When you match thread weight to fabric, your shirts feel soft. They also look neat. Always test your thread and fabric before you start. This helps you avoid problems later. Good matches keep your shirts comfy and strong.
Pre-Washing Tips
Pre-washing your fabric is a smart step. It helps your shirts keep their shape and size. Here’s why:
Pre-washing cotton and blends stops shrinking later.
Your designs stay the right size after washing.
If you skip pre-washing, designs can pucker or warp.
Pre-stretching fabric and using stabilizer keeps shirts smooth.
Test your fabric on scraps to check for shrinking.
Tip: Hoop your fabric with even tension. Do not pull too tight. This keeps your shirts looking neat and feeling soft.
If you follow these steps, your shirts will always look great. Quality at every step helps your shirts last and stand out.
Design Placement Options
Popular Placements
When you start planning your embroidered t-shirt, you have lots of design placement options. The most popular spots are the left chest, center chest, and full front. Many people also like to put embroidered designs on the back collar, upper back, or even the sleeves. Each spot gives your shirt a different look. For example, a small logo on the left chest feels classic and professional. A big, bold design on the full front stands out and grabs attention. If you want something subtle, try a tiny embroidered logo on the back collar or sleeve. These placements work well for both simple and detailed embroidered designs.
Tip: Think about how you want your shirt to feel. Do you want your embroidered design to be the main focus, or just a small accent?
Sizing Tips
Getting the size right makes a big difference. Research shows that the best size for a center chest embroidered design is usually 6 to 10 inches wide and 6 to 8 inches high. For a full front, go a bit bigger—10 to 12 inches wide and up to 14 inches high. Left chest designs look best at 3 to 4 inches. If you use a huge embroidered design, your shirt might feel stiff or heavy, especially if the fabric is light. Always adjust the size for youth shirts or smaller sizes so the embroidered area does not take over the whole shirt.
Placement Area | Typical Size Range (inches) | Placement Details | Design Tips |
|---|---|---|---|
Left Chest | 3"-4" | 4" down from neckline | Keep designs small and simple |
Center Chest | 6"-10" | 3-4" below neckline | Good for logos or short slogans |
Full Front | 10"-12" wide, 10"-14" high | 3" below neckline | Ideal for bold, detailed designs |
Sleeve | 1"-4" | Centered on sleeve | Great for subtle branding |
Balancing Design and Shirt
You want your embroidered design to look balanced on the shirt. Place your design about 3 to 4 inches below the collar for the full front or center chest. For the left chest, measure 4 inches down from the neckline and 3 inches from the center. If your design is not symmetrical, try to center it by eye, not just by measuring. This helps your embroidered shirt look natural and professional. Avoid making the embroidered area too large, or it can feel uncomfortable and look awkward. Always check your design placement options before you start stitching. When you balance size and placement, your embroidered shirts will always look their best.
Custom T Shirt Embroidery Techniques
Tools and Equipment
You need the right tools to make your custom t shirt embroidery look sharp and last long. Start with a good embroidery machine. Home machines work for small projects, but commercial machines handle bigger jobs and more colors. You also need embroidery hoops. These hoops hold your shirt tight so the stitches stay even. Magnetic hoops, like the Mighty Hoop, make hooping faster and keep tension even. This helps you avoid puckering and hoop burn.
Here’s a quick list of what you’ll need for custom embroidery:
Embroidery machine (home or commercial)
Embroidery hoops (regular or magnetic)
Sharp embroidery scissors
Stabilizers (cut-away, tear-away, or water-soluble)
Marking tools (fabric pens or chalk)
Adhesive spray (for tricky fabrics)
Calibrated tension tools (to check hoop tightness)
Good lighting
Tip: Magnetic hoops save time and keep your fabric from slipping. You’ll notice fewer mistakes and better results.
Using Stabilizers
Stabilizers are a must for custom t shirt embroidery. They keep your fabric from stretching or moving while you stitch. If you skip stabilizers, your design can end up crooked or puckered. For stretchy or thin shirts, use a medium-weight cut-away stabilizer. This type cuts down on puckering by about 60%. It also keeps your stitches looking neat after many washes.
You should always match your stabilizer to your fabric. For sweatshirts or stretchy tees, cut-away or tear-away stabilizers work best. Magnetic hoops help spread pressure evenly, so you don’t get hoop burn or fabric slippage. If you use adhesive spray, your fabric and stabilizer stay together, even on slippery shirts.
Here’s a table to help you pick the right stabilizer:
Fabric Type | Best Stabilizer | Why It Works |
|---|---|---|
Cotton/Blends | Tear-away or cut-away | Prevents shifting and puckering |
Stretchy/Knits | Medium cut-away | Stops distortion and stretching |
Delicate Fabrics | Water-soluble | No residue, gentle on fabric |
Heavyweight | Tear-away | Supports dense stitching |
Note: Using the right stabilizer and hooping method can reduce setup time by almost half and keep your embroidery looking professional.
Hooping and Preparation
Hooping is one of the most important steps in custom embroidery. If you hoop your shirt wrong, your design can shift or stretch. Always lay your shirt flat and smooth out any wrinkles. Place the stabilizer under the fabric, then set both into the hoop. Magnetic hoops make this step easier and faster. They adjust to fabric thickness and hold everything tight without leaving marks.
Check the tension with a calibrated tool. This step cuts down on fabric movement by about 40%. For best results, match your hoop size to your design. Too big or too small can cause shifting or missed stitches. If you use textured or stretchy shirts, magnetic hoops grip better and keep your design in place.
Pro Tip: Always do a trace test with your machine before you start stitching. This helps you spot any problems with placement or tension.
Step-by-Step Process
You want your custom t shirt embroidery to look clean and last a long time. Follow these steps to get great results and avoid common mistakes:
Import your logo or design into embroidery digitizing software. Use a vector file for best accuracy.
Set stitch types for each part of your design. Satin stitches work well for text. Fill stitches cover large areas. Running stitches outline shapes.
Choose stitch directions and add underlay stitches. This keeps your fabric stable and stops distortion.
Adjust stitch density and use push-pull compensation. These settings help prevent thread breaks and keep your design lined up.
Plan your stitching order. Group similar colors and shapes together. This reduces trims and jumps, making your embroidery smoother.
Assign thread colors to match your design exactly.
Preview your design in the software. Then, do a test stitch on a scrap shirt or similar fabric. This step helps you catch any problems before you start on your real shirt.
Callout: Skipping test stitching is one of the biggest mistakes in custom embroidery. Always test first to avoid wasted shirts and thread.
If you follow these steps, you’ll see fewer thread breaks, less distortion, and better alignment. Your custom t shirt embroidery will look professional and last longer. These embroidery tips help you master common embroidery techniques and avoid frustration.
You can use these common embroidery techniques for all kinds of custom projects. Whether you want a simple logo or a detailed graphic, the right tools and steps make a big difference. Try these methods and watch your custom shirts stand out from the crowd.
Common Mistakes to Avoid
Overly Complex Designs
You might think a very detailed design will look cool. But too many details can cause problems for your custom embroidered shirts. If you add lots of tiny parts or layers, your shirt can pucker and threads might break. Thick embroidered patches can also feel bulky. Here’s what can happen:
Dense embroidered designs push the fabric around. This is like dropping a heavy toy in water. Your shirt can pucker and lose its shape.
Short stitches and packed rows make the area stiff and thick.
Heavy thread or too many layers can break threads and look messy.
Beginners sometimes add more stitches for better coverage. This actually causes more mistakes.
The same embroidered design can look different on each shirt. It depends on the fabric you use.
If you want your shirts to last and look good, keep your embroidered designs simple and bold.
Poor Material Choices
Picking the wrong fabric or thread can ruin your shirts. Thin or stretchy shirts do not hold embroidered designs well. Heavy thread on light fabric makes shirts feel stiff and not comfy. Always choose high-quality cotton or blends for your shirts. Good thread keeps your embroidered designs bright and smooth after many washes. When you match the right materials, your shirts feel soft and look professional.
Bad Placement
Bad placement is a common mistake with custom embroidered shirts. If you put your embroidered design too high, too low, or off-center, the shirt looks odd. Crooked logos or text make your shirts look cheap. People notice these mistakes right away. Loose hoops, uneven fabric, or skipping test runs cause most placement problems. You can avoid these by using center marks, checking hoop tightness, and testing on scrap fabric. When you get the placement right, your shirts look neat and make people happy.
Tip: Always check your placement before you start stitching. A few extra seconds can save your shirt!
Skipping Prep Steps
You might want to start embroidering right away, but skipping prep steps causes problems. If you don’t pre-wash your shirts, the embroidered area can shrink or pucker after washing. Forgetting stabilizer or not hooping tight enough makes the design shift or stretch. Always test your embroidered design on a scrap shirt first. This helps you find mistakes before they end up on your real shirts. Taking time to prep means your shirts will always look and feel great.
Mistake | What Happens | How to Fix It |
|---|---|---|
Overly complex design | Puckering, thread breaks, stiffness | Keep designs simple and bold |
Poor material choice | Stiff, uncomfortable shirts | Use quality cotton and good thread |
Bad placement | Crooked or off-center designs | Use marks, test runs, check tension |
Skipping prep steps | Shrinking, shifting, distortion | Pre-wash, use stabilizer, test first |
If you avoid these mistakes, your shirts will always stand out for their quality and comfort.
Likeu Clothong Company & Services
About Likeu Clothong
You want your custom embroidered shirts to look amazing. Likeu Clothong helps you make that happen. This company started because people wanted better custom shirts. You get a team that cares about every embroidered detail. Likeu Clothong uses top machines and skilled workers. They check every shirt before it leaves the shop. You can trust them to make your custom embroidered shirts stand out. They listen to what you want and help you pick the best embroidered design.
Custom Embroidered Shirts Services
Likeu Clothong offers many ways to create your custom embroidered shirts. You can choose from lots of shirt styles and colors. You pick the fabric, the thread, and the embroidered design. The team helps you with every step. They show you samples and help you decide what looks best. You can order one shirt or a hundred custom embroidered shirts. The company uses strong threads so your embroidered shirts last a long time. You get clear, bold designs on every custom shirt. If you want something special, ask about their customization options. You can add names, logos, or even your own artwork to your custom embroidered shirts.
Tip: If you are not sure what you want, ask for a sample. Likeu Clothong will help you see how your embroidered design looks on a real shirt.
Why Choose Likeu Clothong
You want your custom embroidered shirts to look sharp and feel good. Likeu Clothong gives you both. The company uses high-quality materials for every custom shirt. You get fast service and friendly help. The team checks every embroidered shirt for mistakes. You do not have to worry about crooked designs or bad stitching. Likeu Clothong makes sure your custom embroidered shirts look perfect every time.
Here’s what you get when you choose Likeu Clothong:
Many shirt styles and sizes for your custom needs
Bright, strong threads for every embroidered design
Fast turnaround on all custom embroidered shirts
Helpful staff who answer your questions
Careful checks on every embroidered shirt
You can trust Likeu Clothong to make your custom embroidered shirts the best they can be.
You want your custom embroidered shirts to get noticed. Start with bold and simple designs. Always use good materials for each shirt. Put your embroidered logo or graphic in a smart place. Careful work helps your shirts look neat and last longer. These tips make your shirts more than just clothing. They help your shirts show off your brand. Strong designs and good materials make your shirts feel special. You will see more people remember your brand with each shirt. Embroidered clothes like shirts, hoodies, and uniforms last longer than printed ones. People like custom embroidered shirts because they are strong and stylish. Businesses use these shirts to get seen at events and on social media. The right design and placement help you reach your audience. Try making your own shirts and notice the change. If you want the best shirts, Likeu Clothong can help you make shirts that stand out.
FAQ
How do I wash custom embroidered shirts?
You should turn your shirt inside out. Use cold water and a gentle cycle. Avoid bleach. Hang dry or use low heat. This keeps your embroidery bright and your shirt soft.
Can I use any design for embroidery?
Not every design works well. Simple shapes and bold lines look best. Tiny details or thin lines may not show up. Test your design first for best results.
What fabric works best for t-shirt embroidery?
Cotton and cotton blends work great. These fabrics hold stitches well and feel comfortable. Avoid thin or stretchy shirts. They can make your embroidery look messy.
How long does custom embroidery last?
Good embroidery lasts for years. If you use quality thread and fabric, your design stays bright. Wash your shirt gently to keep it looking new.